You picked your LMS. You signed the contract. Now comes the part that actually determines whether the platform works or collects dust: integration. Connecting an LMS to your HR system, CRM, SSO provider, and other tools is where most implementations either gain momentum or stall out. A solid LMS integration checklist keeps that process organized and prevents the kind of gaps that lead to duplicate data, broken logins, and manual workarounds nobody has time for.
At Atrixware, we’ve built Axis LMS to connect with over 5,000 systems, ADP, Salesforce, BambooHR, Okta, Azure, and more, through native integrations, REST API, webhooks, and SAML SSO. We’ve seen firsthand what separates a smooth rollout from a painful one, and it almost always comes down to preparation before the first API call is made. The technical pieces matter, but so does knowing which questions to ask and in what order.
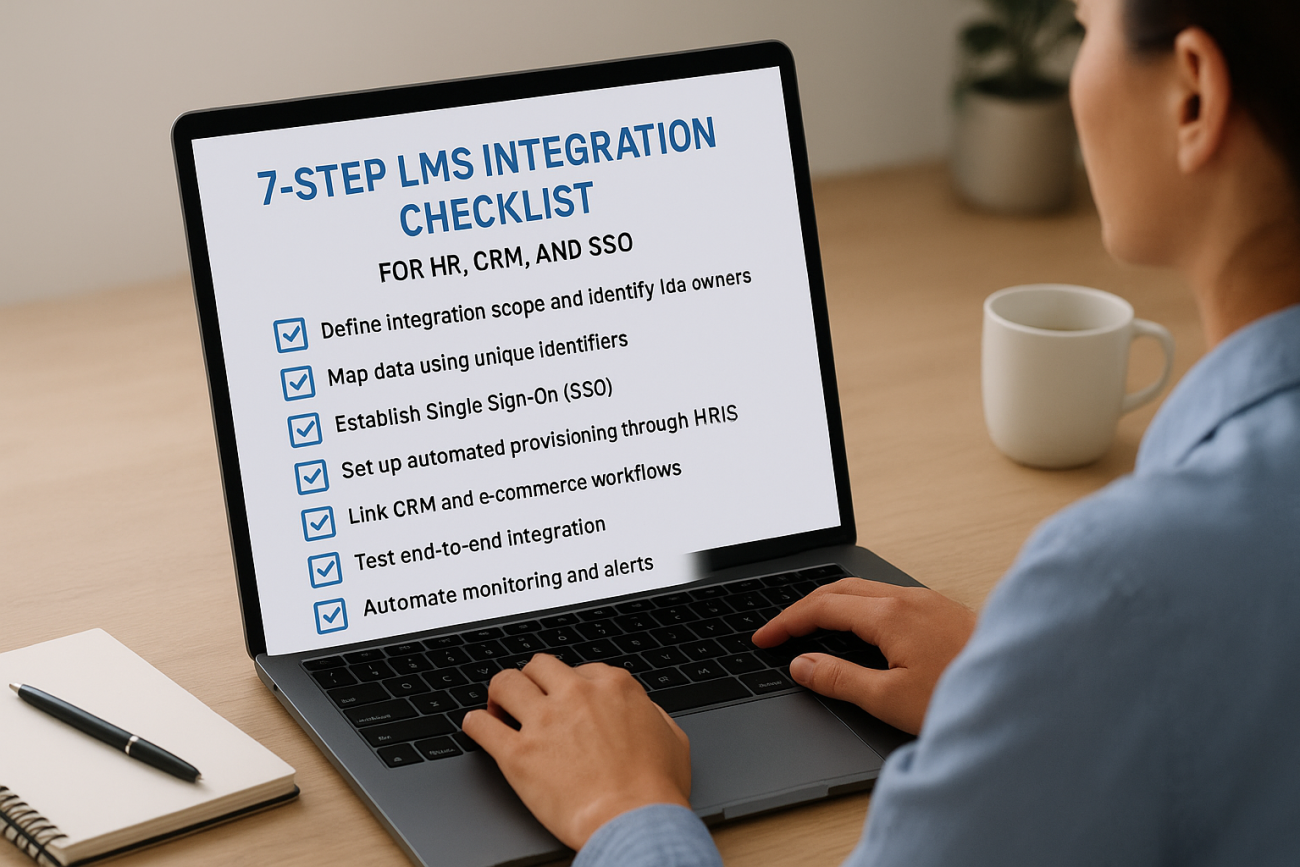
This article breaks the integration process into seven clear steps, covering everything from auditing your current tech stack to testing data flows and planning for scale. Whether you’re an HR manager connecting your HRIS or an IT lead configuring SSO, this checklist gives you a repeatable framework to follow. No guesswork, no backtracking, just a direct path to a fully connected training system.
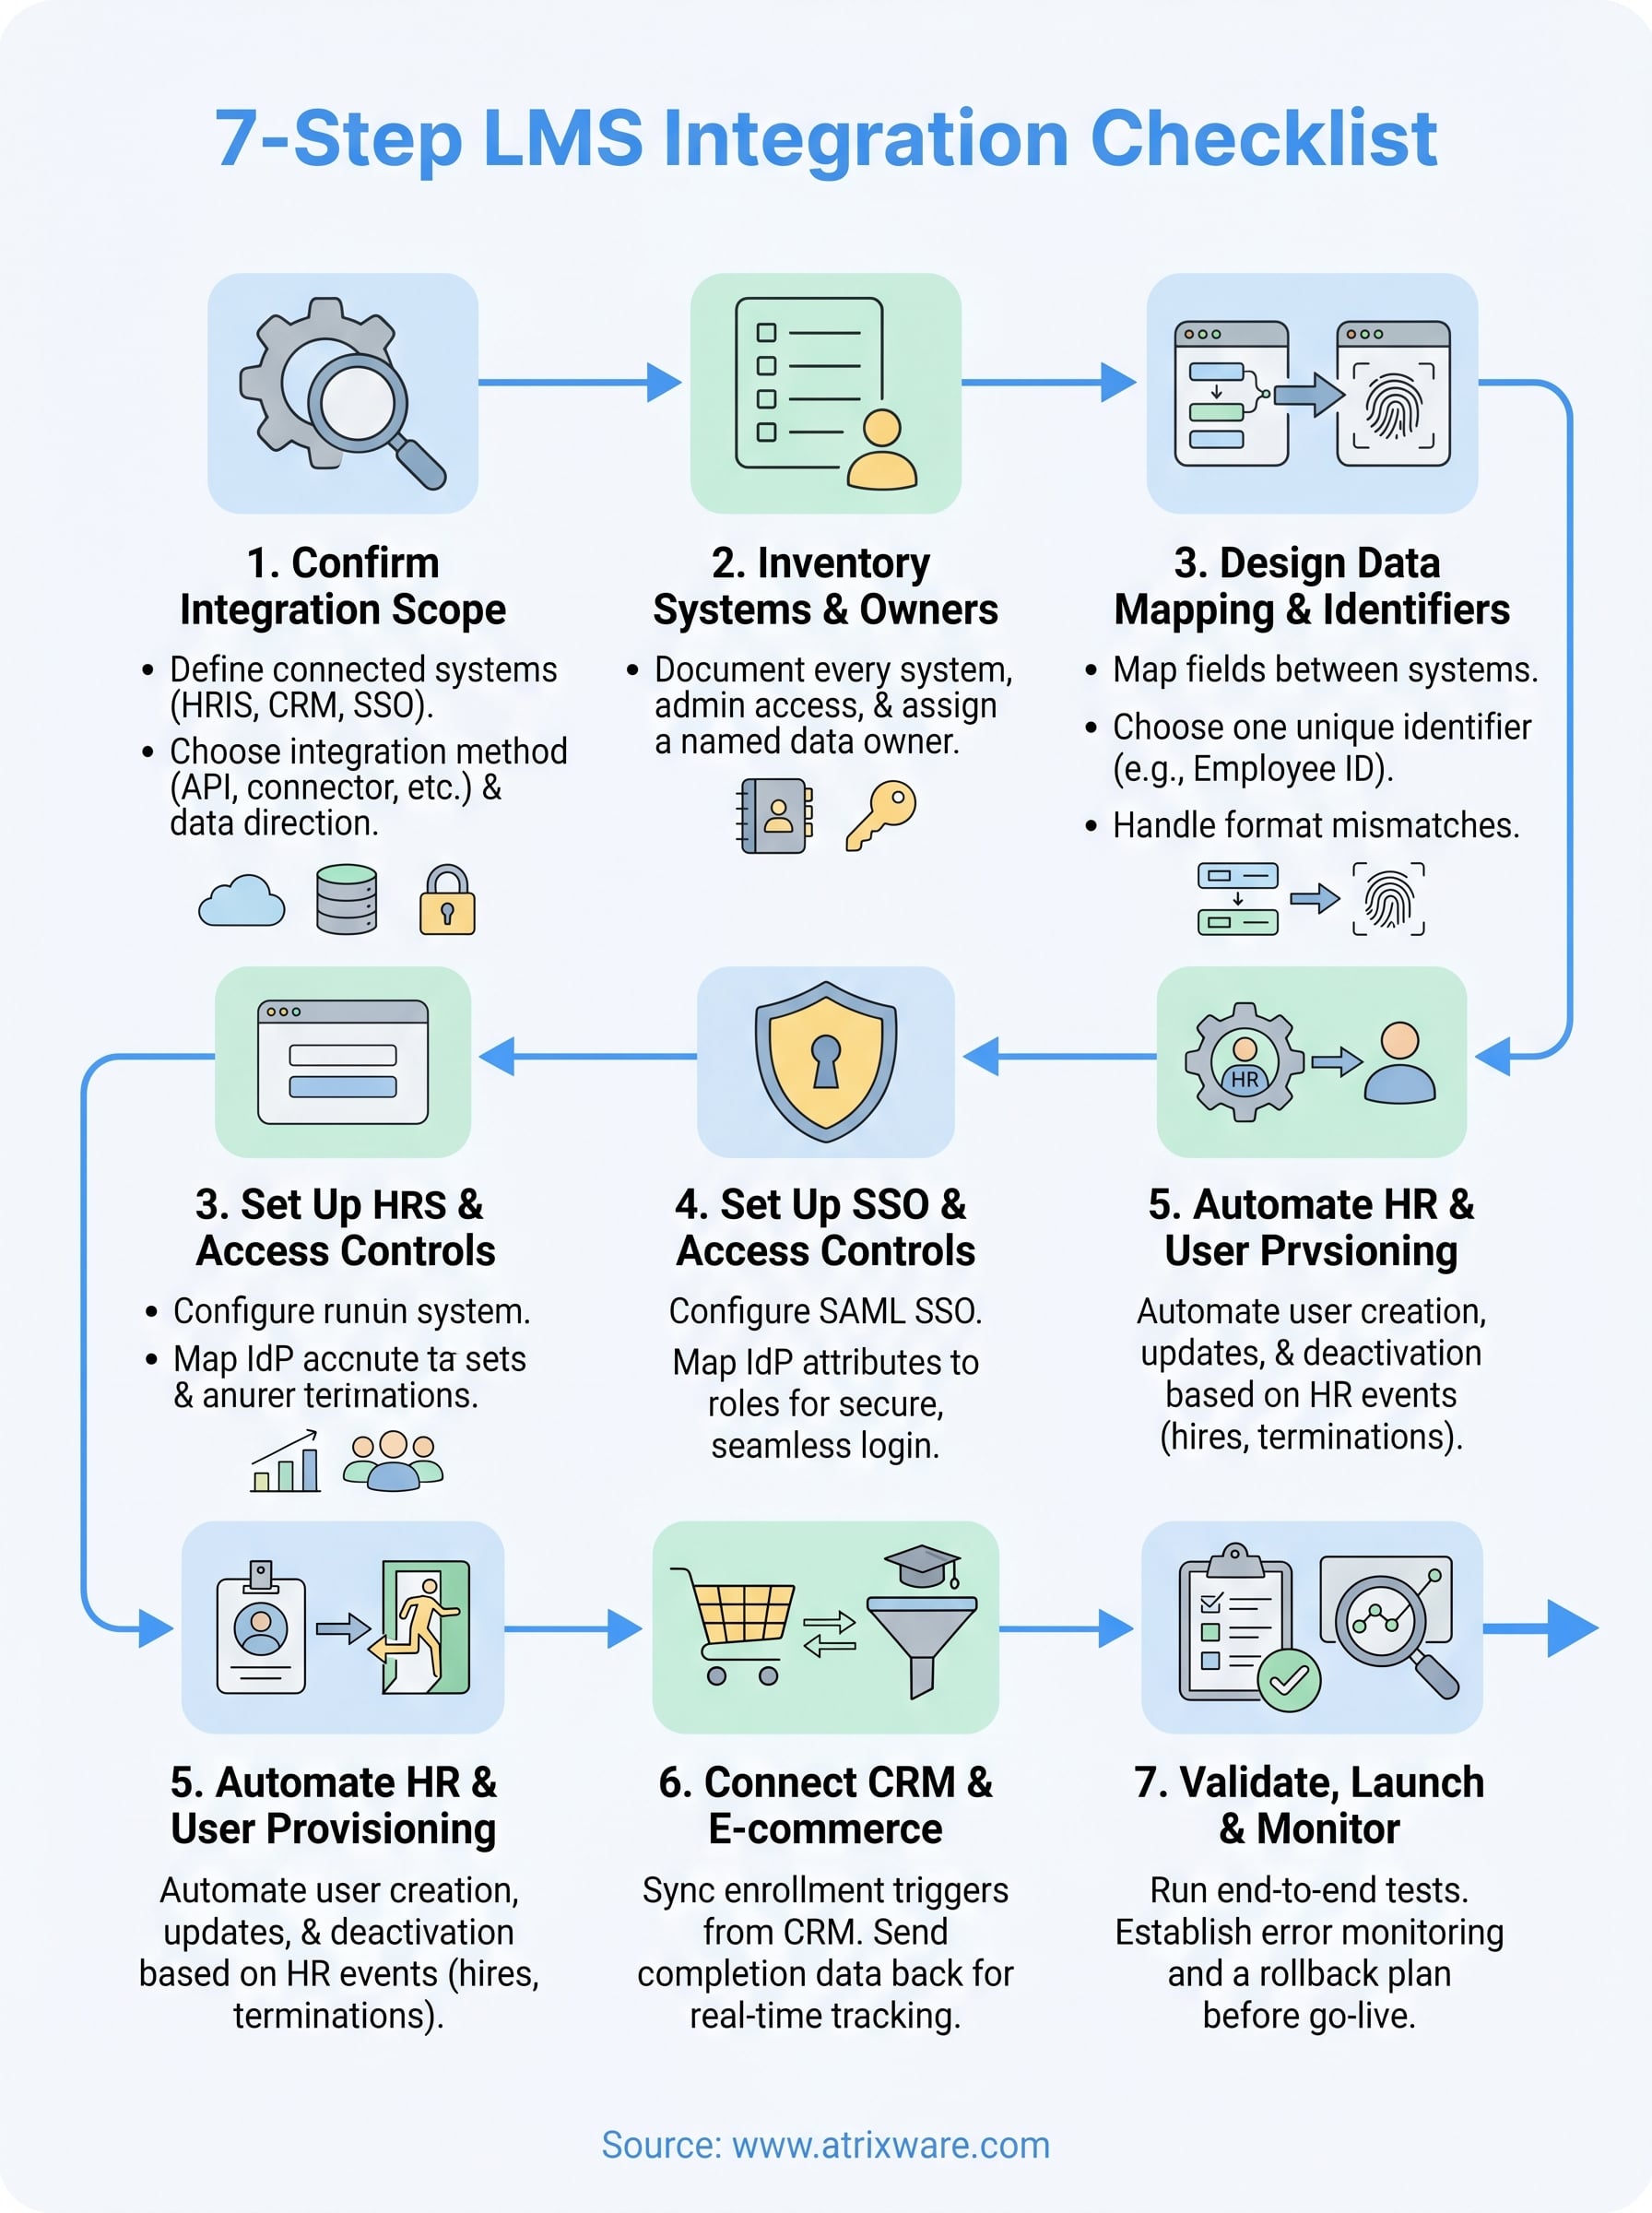
1. Confirm Axis LMS integration scope
Before you configure anything, you need a clear picture of what Axis LMS will connect to in your environment. Scope creep is the fastest way to blow an integration timeline, and it almost always starts here, when teams skip this step and discover missing requirements mid-build. Getting this right is the foundation of any solid lms integration checklist.
Goal of this step
Your goal is to define which systems will exchange data with Axis LMS and what type of data flows in each direction. This prevents surprise dependencies from surfacing mid-project and gives every stakeholder a shared baseline to work from before any configuration begins.
Decisions to make
You need to decide which integration method fits each connection: native connector, REST API, webhook, or the Axis LMS Integration Builder. You also need to confirm whether each integration will be one-way or bidirectional, and pin down who owns each connected system on the vendor or department side.
Checklist to complete
Work through these items before moving to Step 2. Completing this checklist confirms your integration scope is defined and ensures no connected system is left off the plan:
- List every system Axis LMS needs to connect to (HRIS, CRM, SSO, e-commerce, etc.)
- Identify the integration method for each connection
- Confirm data flow direction (read, write, or both)
- Document the data owner or admin contact for each system
- Verify API access or credentials are available for each system
Locking down the integration method and data direction for every connection before touching a single setting prevents far more rework than any shortcut saves.
How to test it
Review your completed scope list with the admin of each connected system and get a written sign-off. Confirming alignment at this stage catches misaligned expectations before they turn into technical problems that require rebuilding work later. If a system admin cannot confirm the data you plan to pull, flag it now.
Common pitfalls to avoid
The most common mistake is treating scope confirmation as optional. Teams that skip it often end up rebuilding integrations after launch because a system was overlooked or a data direction was incorrectly assumed. Also watch for shadow systems, tools that individual departments rely on daily that central IT does not track or document officially.
2. Inventory systems and data owners
With your integration scope confirmed, you now need a complete picture of every system in play and who controls each one. This step turns your scope list into an actionable inventory that your whole project team can reference throughout this lms integration checklist process.
Goal of this step
Your goal is to document every system, its current state, and the person responsible for its data. Having a named data owner for each platform means decisions get made faster and nothing gets delayed waiting for the right contact during configuration.
Decisions to make
You need to decide who holds admin access to each system and confirm that person can act during the integration window. Pinning down API rate limits, version numbers, and authentication methods for each platform at this stage prevents unexpected blocks during the build.
Checklist to complete
Run through each item below before moving to data mapping:
- Document every connected system with its current software version
- Assign a named data owner and a backup contact for each system
- Confirm admin credentials and API key availability
- Note any known rate limits or data export restrictions
How to test it
Send a brief confirmation message to each data owner and ask them to verify the system details you recorded. Getting a direct reply confirms both accuracy and availability before the technical work begins.
Common pitfalls to avoid
Listing systems without a specific named owner is a frequent mistake that causes delays. If a system has no assigned contact, questions stall and timelines slip.
Every system on your list needs a real person attached to it before integration work starts.
3. Design data mapping and identifiers
Data mapping is where abstract integration plans become concrete instructions. With your system inventory complete, you now need to specify exactly which fields transfer between Axis LMS and each connected platform and confirm that every record has a consistent identifier to match on. Skipping this step is the leading cause of duplicate user records and broken sync jobs in any lms integration checklist.
Goal of this step
Your goal is to produce a field-level map for every data connection. That map tells Axis LMS where each piece of data comes from, where it goes, and what format it needs to arrive in before a sync runs.
Decisions to make
You need to decide which field serves as the unique identifier (usually an employee ID or email) across each system pair. You also need to confirm how to handle field format mismatches, such as date formats or name capitalization, before they corrupt records at scale.
Checklist to complete
- Map every field being synced between Axis LMS and each connected system
- Confirm a single unique identifier per user across all platforms
- Document field format requirements and any transformation rules
- Flag any fields with no direct equivalent in the receiving system
Agreeing on one unique identifier per user before any sync runs prevents duplicate records that are painful to clean up later.
How to test it
Run a sample sync with a small test dataset and verify each mapped field lands in the correct destination with the right format.
Common pitfalls to avoid
Mapping fields by display name rather than system field name causes silent failures. Always confirm the actual API field names with each system admin before finalizing your map.
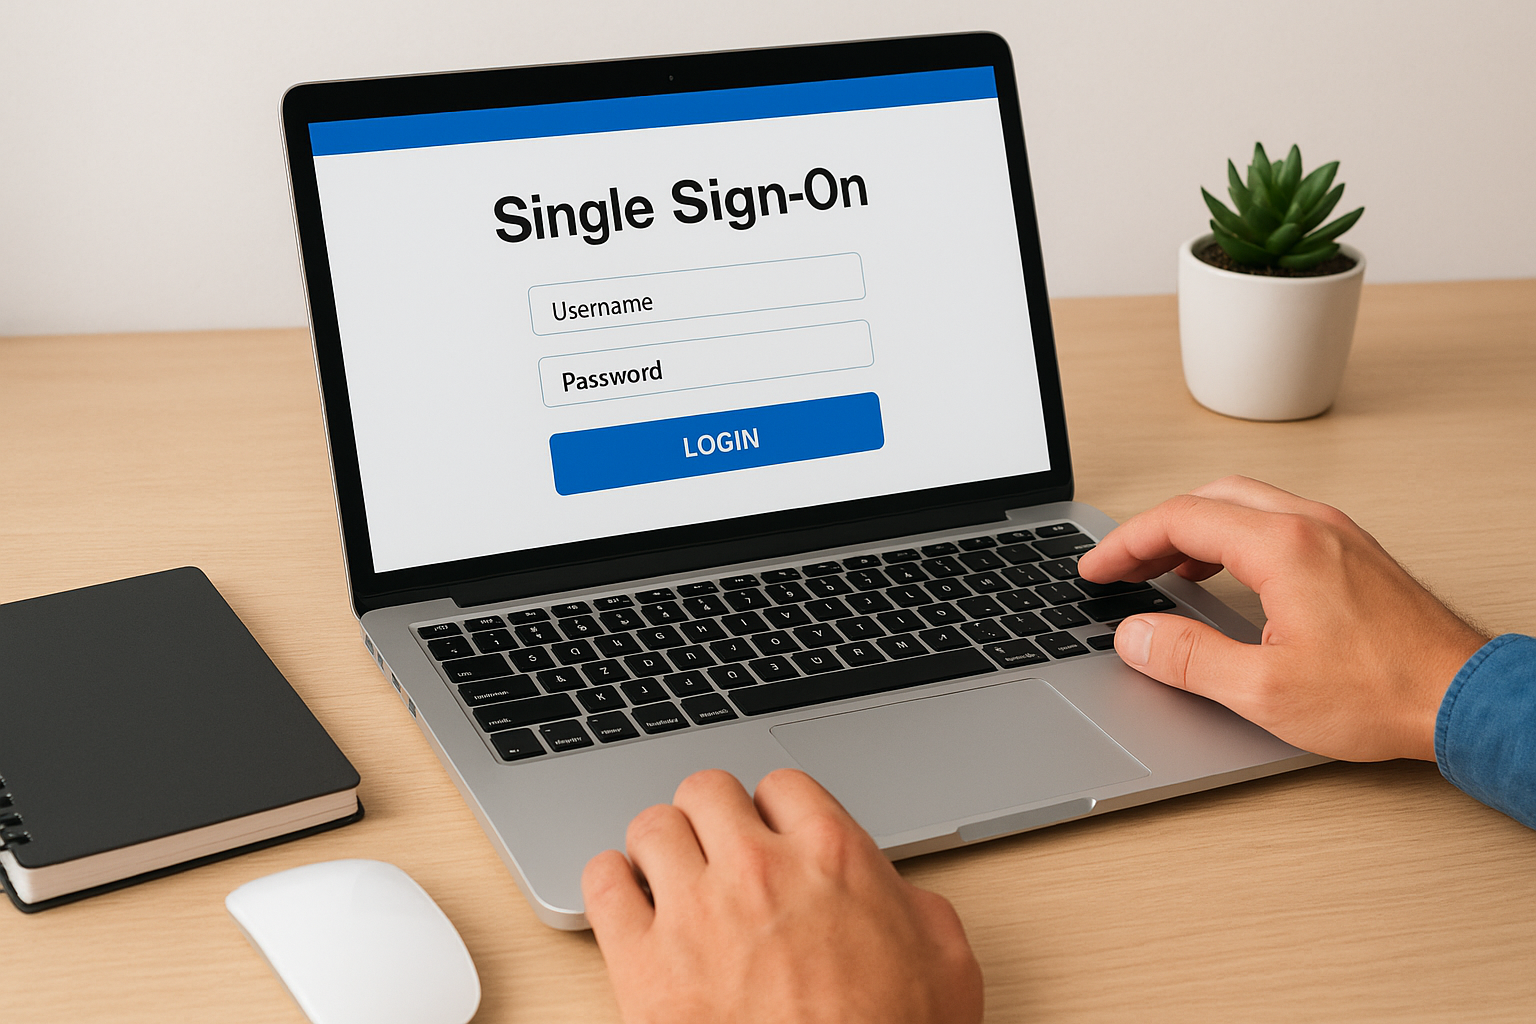
4. Set up SSO and access controls
Single sign-on is the step in your lms integration checklist where user experience and security meet. Getting SSO configured correctly means learners log in once and land directly in Axis LMS without a separate password, while your IT team retains full control over who can access what.
Goal of this step
Your goal is to configure SAML SSO so Axis LMS recognizes users authenticated by your identity provider (IdP) and maps them to the correct roles inside the platform. This step also covers role-based access controls to ensure each user group sees only what they need.
Decisions to make
You need to decide which IdP you are using (Okta, Azure AD, Salesforce, or Ping Identity) and confirm that Axis LMS supports it. You also need to define which user attributes the IdP will pass to Axis LMS, such as department or group membership, to drive automatic permission assignments.
Checklist to complete
- Obtain your IdP metadata file or endpoint URL
- Map IdP user attributes to Axis LMS role fields
- Configure role-based access rules for each learner and admin group
- Test both SP-initiated and IdP-initiated login flows before go-live
Misconfigured attribute mapping is the most common reason SSO works in testing but breaks for a subset of real users at launch.
How to test it
Log in through your IdP as three different user types and confirm each lands in the correct role with the right permissions applied.
Common pitfalls to avoid
Failing to test multiple role types before launch is the mistake that surfaces after go-live. Also confirm your IdP session timeout settings align with your Axis LMS session policy to prevent confusing mid-session logouts.
5. Automate HR and user provisioning
Manual user management does not scale. Once your SSO is live, the next item on your lms integration checklist is making sure that users are created, updated, and deactivated in Axis LMS automatically based on HR system events, not by someone running a spreadsheet import every Monday morning.
Goal of this step
Your goal is to configure automated user provisioning so that HR actions in systems like ADP, BambooHR, or Zoho trigger the correct changes in Axis LMS without manual intervention. This keeps your user roster accurate and removes a common source of compliance risk when terminated employees retain access.
Decisions to make
You need to decide which HR events trigger provisioning actions: new hires, role changes, department transfers, and terminations. Confirm whether Axis LMS will pull data on a scheduled sync or via real-time webhooks, since the right choice depends on how quickly your HR system publishes changes.
Checklist to complete
- Map HR system fields to Axis LMS user profile fields
- Configure automated enrollment rules based on department or role
- Set up deactivation triggers for termination events
- Test new hire, transfer, and offboarding flows in a staging environment
A user who never gets properly deactivated is both a security gap and an active compliance failure.
How to test it
Run a test hire and termination in your HR system and confirm that Axis LMS reflects both changes within the expected sync window.
Common pitfalls to avoid
Relying on a single sync trigger without a fallback or error alert means failed provisioning jobs go unnoticed. Build in notification rules so your admin team catches any sync failures before they affect real users.
6. Connect CRM and e-commerce workflows
If your organization sells training or tracks customer learning, your CRM and e-commerce platforms need to exchange data with Axis LMS in real time. This step in your lms integration checklist closes the loop between sales activity and learning progress so records stay accurate without manual updates.

Goal of this step
Your goal is to configure Axis LMS to receive enrollment triggers from your CRM and send completion data back, keeping sales and training records synchronized automatically. This removes the manual handoff between your sales team and your training team that slows down customer onboarding.
Decisions to make
You need to decide which CRM events (such as a closed deal or a contact status change) should trigger course enrollment in Axis LMS. Confirm whether Axis LMS will push completion data back to your CRM as a field update or an activity log entry, since that choice affects how your sales team surfaces learning progress.
Checklist to complete
Work through these items before enabling live data flows:
- Map CRM contact or account fields to Axis LMS user profiles
- Configure enrollment triggers based on specific CRM events
- Set up completion data pushback to the CRM record
- Connect e-commerce purchase events to automatic course access grants
A purchase that does not trigger immediate course access loses the learner’s momentum at the worst possible moment.
How to test it
Run a test transaction through your e-commerce platform and confirm that course access appears in Axis LMS within the expected time window.
Common pitfalls to avoid
Sending completion data to the wrong CRM contact record is a common error when CRM contacts and LMS users share similar but not identical identifiers. Confirm your unique identifier match before enabling live data pushback.
7. Validate, launch, and monitor integrations
With every connection configured, the final step in your lms integration checklist is confirming that all integrations work together as a complete system before you go live, and that you have monitoring in place to catch failures after launch rather than days later.
Goal of this step
Your goal is to run a full end-to-end validation across every integration in sequence, then establish ongoing monitoring so that any sync failure or broken connection surfaces immediately and gets resolved before it affects real users.
Decisions to make
You need to decide what constitutes a passing test for each integration and who holds sign-off authority. Also confirm whether you need a phased rollout for high-risk connections before enabling them for your full user base.
Checklist to complete
- Run end-to-end tests covering every integration type configured
- Confirm data accuracy in both source and destination systems
- Set up automated error alerts for sync failures
- Document a rollback plan for each connection
Launching without error alerts means the first person to notice a broken integration is often a frustrated learner, not your admin team.
How to test it
Simulate real user scenarios across each path: a new hire provisioned through your HR system, an SSO login, and a CRM enrollment trigger. Confirm that each data flow completes accurately from start to finish.
Common pitfalls to avoid
Skipping load testing before launch is a frequent oversight. Confirm your integrations hold up under the expected user volume, not just a single test account.
Next steps
Working through this lms integration checklist step by step gives you a structured path from scope confirmation to live monitoring. Each step builds on the last, so skipping any phase increases the chance that a connection breaks in production where it affects real users and real data.
The specifics depend on your tech stack and technical resources, and how complex your user provisioning rules are. Knowing where you stand before you start saves time and prevents misaligned expectations during the build.
If you are not sure whether your organization is ready to start integration work, take the LMS readiness quiz to get a clearer picture. Or, if you want to see Axis LMS and its integration capabilities in action, start an Axis LMS admin demo and explore the platform yourself before committing to a configuration plan.