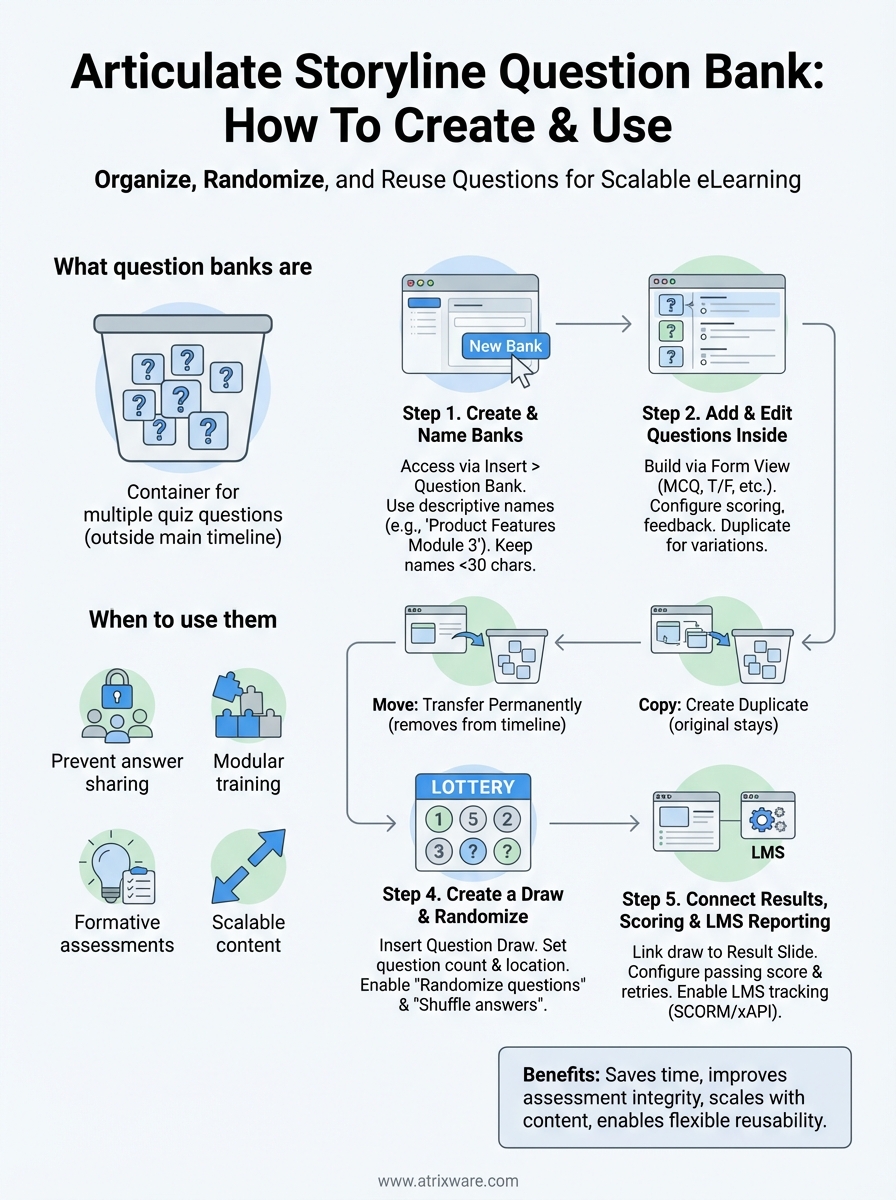
Creating quizzes in Articulate Storyline can quickly become tedious when you’re manually placing questions slide by slide. That’s where the Articulate Storyline question bank feature comes in, it lets you organize, randomize, and reuse quiz questions across multiple projects without the repetitive grunt work. For anyone building eLearning content that needs to scale, this is a must-know tool.
Whether you’re developing compliance training, product education, or employee onboarding courses, question banks give you flexibility that static quizzes simply can’t match. You can pull random questions from a pool, prevent learners from memorizing answer patterns, and maintain consistency across your training modules. Once your Storyline courses are ready, they integrate seamlessly with learning management systems like Axis LMS to track completions, scores, and learner progress.
This guide walks you through everything you need to know about question banks in Storyline, from creating your first bank to configuring draw settings and troubleshooting common issues. By the end, you’ll have a clear process for building smarter assessments that save time and improve learning outcomes.
What question banks are and when to use them
A question bank in Articulate Storyline is a container that holds multiple quiz questions outside your main slide timeline. Instead of placing questions directly onto slides, you store them in a centralized bank and then configure Storyline to pull a specific number of questions from that bank each time a learner takes the quiz. This setup gives you control over randomization, reusability, and quiz variations without duplicating slides or creating multiple project files.

How question banks function in Storyline
Question banks act as hidden repositories that sit behind your quiz structure. When you create a bank, you add questions to it just like you would build regular quiz slides, but those questions don’t appear in your slide panel until you create a "draw" from the bank. A draw tells Storyline how many questions to pull and where to insert them in your course. Each learner who accesses the quiz sees a different combination of questions if you set the draw to randomize, which prevents memorization and maintains assessment integrity.
You can create multiple banks within a single project, each serving different purposes or covering different topics. For example, you might build one bank for compliance questions and another for product knowledge, then draw from each bank separately to create a comprehensive final exam. The articulate storyline question bank feature also lets you reuse the same bank across multiple quizzes, saving you from rebuilding questions for similar assessments.
Question banks give you the flexibility to randomize quiz content without creating separate versions of your course.
When to use question banks
You should use question banks when you need to prevent learners from sharing answers or memorizing question sequences. Training programs with high-stakes assessments, like certification courses or regulatory compliance modules, benefit significantly from randomization because it ensures each learner faces a unique test experience. Banks also work well when you’re running multiple training sessions with the same material and want to reduce the risk of answer sharing between cohorts.
Another strong use case is when you’re building modular training programs that need consistent assessment standards across different courses. Instead of recreating similar questions in each project, you set up a master bank and reference it wherever needed. This approach maintains question quality and reduces the time you spend on quiz development.
Question banks are also useful for formative assessments where you want to test knowledge retention without overwhelming learners. You can create a large pool of practice questions and configure each practice session to draw only five or ten questions at a time. This keeps sessions short while still covering a broad range of topics over multiple attempts.
Finally, consider using banks when you need to scale quiz content efficiently. If your training program expands and requires additional questions, you simply add them to existing banks rather than rebuilding entire quiz sections. This scalability makes question banks a practical choice for organizations that regularly update their training materials or need to accommodate growing learner populations.
Plan your question bank and quiz structure
Planning your question bank structure before you start building prevents rework and ensures your quiz aligns with your learning objectives. You need to decide how many banks you’ll create, how many questions each bank will hold, and how those questions map to the content you’re teaching. Jumping straight into building without a plan leads to disorganized quiz content and questions that don’t accurately assess what learners need to know.
Start by listing every topic or skill area your course covers, then determine whether each topic needs its own bank or if you can group related topics together. Your structure should match how you want to assess learner knowledge, not just mirror your course outline. If you’re building a compliance course with five modules but only three distinct skill areas, you might only need three banks even though you have more content sections.
Determine how many banks you need
Count the distinct knowledge areas or competencies you’re testing, then create one bank per area if you want granular control over question distribution. For example, if you’re building product training that covers features, troubleshooting, and sales techniques, you’d create three separate banks. This setup lets you pull specific numbers of questions from each area to ensure balanced coverage.
You can also use a single master bank for simple quizzes where randomization matters more than topic distribution. This approach works when all questions carry equal weight and you just want to prevent learners from seeing the same test twice. Single-bank structures simplify management but give you less control over which topics appear in each quiz attempt.
Map questions to your learning objectives
Write down your learning objectives before drafting any questions, then create questions that directly test whether learners achieved those objectives. Each question should connect to a specific objective, and you should have multiple questions per objective to ensure thorough assessment. If an objective states "Identify safety hazards in the workplace," your questions should require learners to recognize hazards, not just recall safety rules.
Aligning your articulate storyline question bank structure with learning objectives ensures your assessments measure actual competency, not just memorization.
Document your mapping in a simple table that shows which questions belong in which bank and which objectives they test. This reference keeps your question development focused and helps you spot gaps where you need additional questions to cover specific objectives adequately.
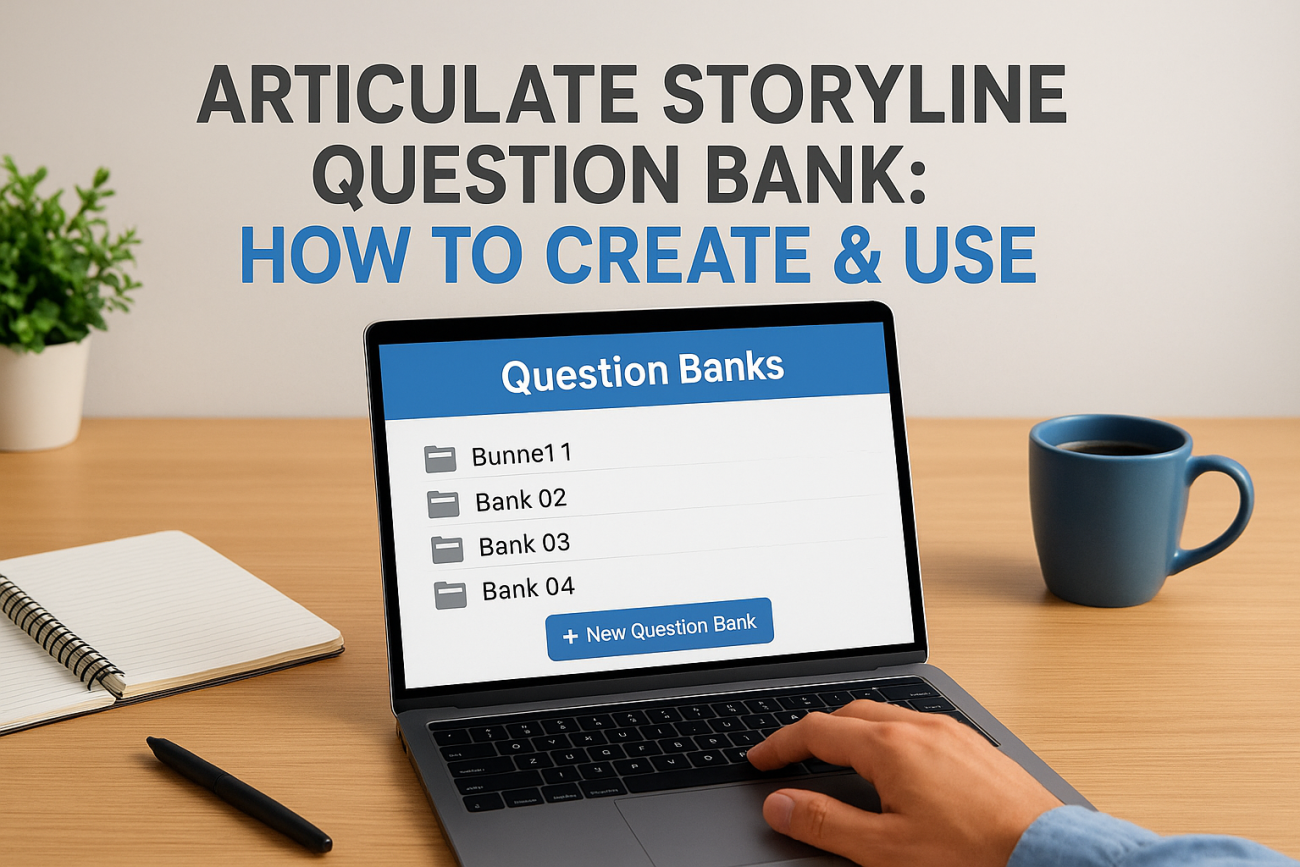
Step 1. Create and name your question banks
Creating your first question bank in Storyline starts with accessing the Form View and opening the question bank manager. This step establishes the foundation for your entire quiz structure, so you want to get both the setup and naming right from the start. Your bank names will appear in dropdown menus and reports, which means clear labeling saves you confusion later when you’re working with multiple banks or troubleshooting quiz behavior.
Access the question bank interface
Open your Storyline project and click on the Insert tab in the ribbon menu at the top of your screen. Look for the Question Bank button in the Questions section and click it to open the question bank manager. This interface shows you all existing banks in your project and lets you create new ones.
Click Create Question Bank in the manager window to generate your first bank. Storyline creates a new bank with a default name like "Question Bank 1" that you’ll want to rename immediately. The manager displays each bank with its question count and provides options to rename, delete, or reorganize banks as needed.
Accessing the articulate storyline question bank interface through the Insert tab keeps your quiz organization separate from your main slide timeline.
Name your banks strategically
Your bank names should describe the content or topic each bank covers, not generic labels like "Bank A" or "Quiz Set 2." Use names that tell you exactly what questions the bank contains, such as "Compliance Regulations" or "Product Features Module 3." This specificity matters when you’re building draws later because you’ll select banks from a dropdown list where vague names become difficult to distinguish.
Keep bank names under 30 characters when possible so they display fully in interface elements without truncation. Include version numbers or dates if you maintain multiple iterations of the same content, such as "Safety Protocol 2026" or "Sales Training v2." Avoid special characters or punctuation marks that might cause issues with LMS reporting or data exports.
Consider these naming examples:
| Good Bank Names | Why They Work |
|---|---|
| Module 1 Safety Procedures | Indicates content and module |
| Product Knowledge Assessment | Describes assessment type |
| Compliance Final Exam | Shows purpose and stakes |
| Advanced Features Quiz | Specifies difficulty level |
Rename your bank by clicking on it in the manager and typing the new name directly into the field. Changes save automatically, and your new name appears everywhere the bank is referenced throughout your project.
Step 2. Add and edit questions inside a bank
Adding questions to your articulate storyline question bank works differently than adding slides to your main timeline. You need to access the bank directly through the question bank manager, then build your questions using Storyline’s standard quiz slide templates. Questions you create inside a bank stay hidden from your main slide panel until you configure a draw, which keeps your project organized and prevents accidental edits to questions that should remain in the bank.

Create new questions directly in the bank
Open the question bank manager by clicking Insert > Question Bank, then select the bank where you want to add questions. Click Edit Questions to open that bank’s slide view, which shows you all questions currently stored in the bank. This view looks similar to your main slide panel but only displays content from this specific bank.
Click the New Slide dropdown in the ribbon menu and select your question type from the available options: multiple choice, true/false, fill-in-the-blank, matching, or any other format Storyline supports. The new question slide appears in your bank’s slide view, where you can add your question text, answer options, feedback layers, and scoring settings just like you would with regular quiz slides.
Configure each question’s properties by selecting the slide and using the Form View panel on the right side of your screen. Set the correct answer, assign point values, choose whether to shuffle answers, and customize feedback for both correct and incorrect responses. Each question operates independently within the bank, which means you can mix different question types and point values in the same bank.
Building questions inside banks keeps your quiz content modular and prevents learners from predicting question sequences.
Edit and refine bank questions
Double-click any question in the bank’s slide view to edit its content, answers, or settings. You can change question text, swap out images, adjust point values, or modify feedback messages without affecting other questions in the bank. Changes save automatically as you work, and you can preview individual questions by clicking the Preview button in the ribbon.
Use the Duplicate function to create variations of existing questions quickly. Right-click a question in the bank’s slide view and select Duplicate to create a copy, then modify the duplicated version to test similar concepts with different wording or examples. This approach saves time when you need multiple questions that follow the same format but test different details.
Step 3. Move vs copy questions into a bank
You can transfer questions from your main slide timeline into an articulate storyline question bank using two different methods: moving or copying. The method you choose affects whether the original question remains on your timeline or disappears after the transfer. Understanding this distinction prevents you from accidentally removing questions you still need in other parts of your course or creating unwanted duplicates that clutter your project.
Move questions to transfer them permanently
Moving a question takes it from your slide timeline and places it directly into the bank without leaving a copy behind. Select the question slide you want to move, then open the question bank manager by clicking Insert > Question Bank. Choose your target bank, click the Move Questions button, and select the slides you want to transfer from the checklist that appears. Storyline removes those questions from your main timeline and adds them to the bank immediately.
Use moving when you’re reorganizing your quiz structure and no longer need questions to appear as standalone slides in your course. This approach works well when you initially built questions on your timeline for testing purposes but now want them stored in a bank for randomization. Moving keeps your project clean by eliminating duplicate content that could confuse learners or cause tracking issues.
Moving questions into banks removes them from your main timeline, so verify you don’t need those slides elsewhere before transferring.
Copy questions to create duplicates
Copying a question creates an exact duplicate inside your bank while leaving the original question on your main timeline unchanged. Right-click the question slide you want to copy, select Copy, then open your target bank’s slide view and paste the question. The copied question appears in your bank with identical content, scoring, and feedback settings as the original.
Choose copying when you need the same question in multiple places, such as a practice quiz on your timeline and a randomized final assessment that pulls from a bank. This method also helps when you want to create question variations, you copy the original into a bank, then edit the bank version to test similar concepts with different wording or examples while keeping your original question intact for reference or reuse.
| Method | Original Question | Use When |
|---|---|---|
| Move | Removed from timeline | Reorganizing quiz structure |
| Copy | Stays on timeline | Need same question in multiple places |
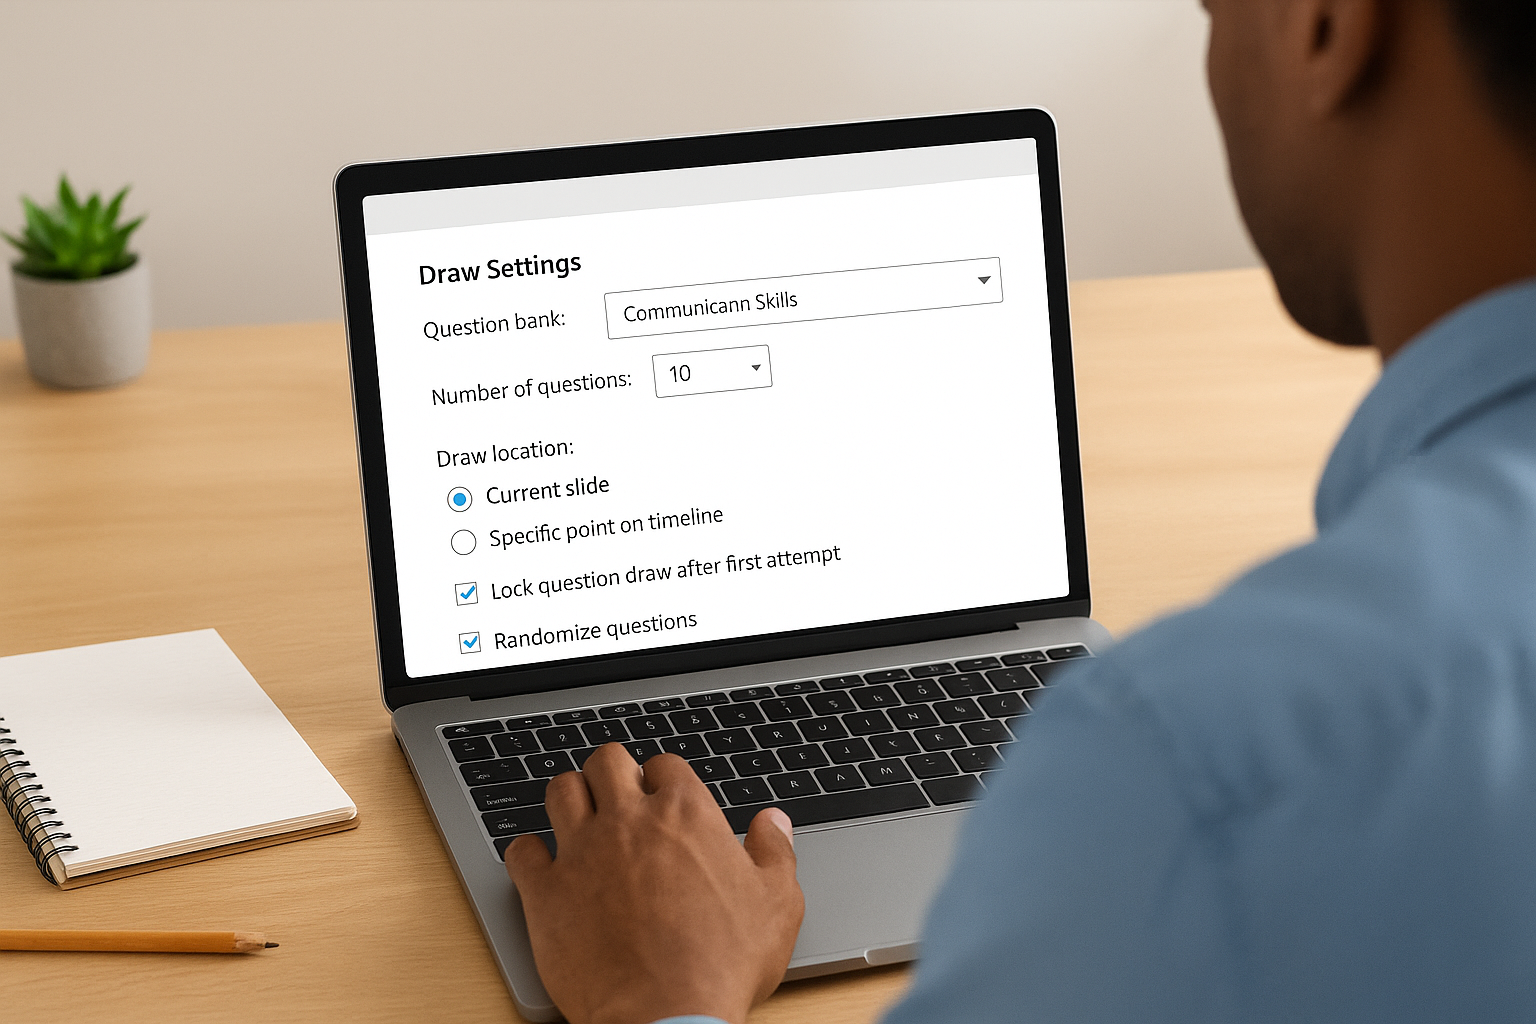
Step 4. Create a draw and control randomization
Creating a draw tells Storyline how many questions to pull from your articulate storyline question bank and where to insert them in your course. This configuration controls the learner experience by determining which questions appear, in what order, and how many attempts each learner gets. Without a draw, the questions you built in your bank remain hidden and inaccessible to learners, which means this step connects your preparation work to the actual assessment.
Configure your draw settings
Navigate to the slide where you want your bank questions to appear, then click Insert > Question Draw from the ribbon menu. Storyline opens a dialog box where you select your source bank from a dropdown list showing all available banks in your project. Choose the bank you want to pull questions from, then specify how many questions to draw in the "Number of questions" field.
Set the draw location by deciding whether Storyline should insert questions at the current slide position or at a specific point in your timeline. Enter the number of questions you want each learner to see, this number can be smaller than your total bank size to enable true randomization across multiple attempts. For example, if your bank contains 20 questions but you only want learners to answer 10 per attempt, enter "10" in the number field.
Configure whether to lock the draw to prevent changes after learners start the quiz by checking the "Lock question draw after first attempt" option. This setting ensures learners who retake the quiz see new randomized questions rather than the same set they failed previously.
Drawing fewer questions than your bank contains creates authentic randomization and prevents learners from memorizing all possible questions.
Control randomization behavior
Check the "Randomize questions" box in the draw dialog to shuffle which questions appear for each learner. This setting pulls a random subset from your bank every time someone starts the quiz, which means two learners taking the same assessment see different question combinations. Leave this option unchecked if you want every learner to see the same questions in the same order.
You can also randomize answer choices within individual questions by editing each question’s properties and selecting "Shuffle answers" in the Form View panel. This additional layer prevents learners from sharing answers based on letter positions (like "the answer is always B") and forces them to read each option carefully.
Step 5. Connect results, scoring, and LMS reporting
After you create your draw and configure randomization, you need to connect your question bank to a results slide that calculates scores and reports data to your LMS. This connection ensures Storyline tracks learner performance accurately and sends completion data to your learning management system. Without proper result slide configuration, your articulate storyline question bank questions might display correctly but fail to record scores or trigger course completion in your LMS.
Link your draw to a result slide
Insert a result slide by clicking Insert > Result Slide from the ribbon menu, then select the draw you created in the previous step from the dialog box that appears. Storyline automatically configures the result slide to track all questions in that draw and calculate a total score based on the point values you assigned to each question. The result slide displays the learner’s score, percentage, and pass/fail status according to your settings.
You can connect multiple draws to a single result slide if you want to combine questions from different banks into one overall assessment. Open the result slide’s properties in Form View, click the "Tracked question slides" button, and check the boxes next to each draw you want to include in the final score calculation. This approach works well when you’re pulling questions from separate topic banks but need one unified assessment score.
Connecting your question bank draw to a result slide activates score tracking and enables LMS reporting for your assessment.
Configure passing scores and retry options
Set your passing score by selecting the result slide and entering a percentage value in the "Passing score" field within Form View. Learners who score at or above this threshold see the passing feedback layer, while those who score below see the failure layer. Choose a percentage that reflects your learning objectives and assessment difficulty, typically ranging from 70% to 80% for most training assessments.
Control how many times learners can retry the quiz by adjusting the "Number of attempts" setting on your result slide. Set this to "Unlimited" for practice assessments where mastery matters more than first-attempt performance, or limit attempts to one or two tries for high-stakes certification exams. Each retry pulls new randomized questions from your bank if you enabled randomization in your draw settings.
Enable LMS tracking and SCORM reporting
Configure your project to report scores to your LMS by clicking Publish > LMS and selecting your SCORM or xAPI version in the publishing settings. Check the box for "Report status" and choose whether to track by completion, passed/failed status, or both. Select your result slide from the dropdown menu in the "Tracking" section to tell Storyline which slide contains the final score data your LMS should receive.
Test your LMS integration by uploading the published course to a test environment in your learning management system before deploying to learners. Verify that scores appear correctly in your LMS gradebook, completion status updates when learners finish, and retry attempts track properly if you allowed multiple quiz attempts.
Next steps
You now have a complete process for building, organizing, and deploying question banks in Articulate Storyline. Start by creating one test bank with five to ten questions, then configure a draw to verify your randomization settings work as expected. This hands-on practice reveals potential issues before you invest time building large question pools across multiple banks.
Once your articulate storyline question bank structure proves solid, focus on publishing your course and connecting it to an LMS that can track learner progress and quiz scores accurately. Axis LMS handles SCORM packages from Storyline seamlessly and provides detailed reporting on assessment results, completion rates, and learner performance across your entire training program. Take the LMS readiness quiz to determine whether your organization is ready to implement a full learning management system, or jump straight into exploring how Axis LMS tracks and reports your Storyline quiz data in real training scenarios.