
Microsoft Teams has become a go-to platform for educators and trainers who want to bring in-person and online instruction together under one roof. But having the tool and actually using it well are two different things. If you’re searching for a practical approach to Microsoft Teams blended learning, you’re probably past the "should we do this?" stage and ready for the "how do we actually make it work?" part. Good, that’s exactly what this guide covers.
Blended learning combines face-to-face teaching with digital activities, giving learners more flexibility without sacrificing structure. Microsoft Teams offers built-in features like channels, assignments, and video meetings that support this model, but getting the setup right matters more than most people realize. A poorly organized Teams environment creates confusion; a well-structured one keeps learners engaged and on track.
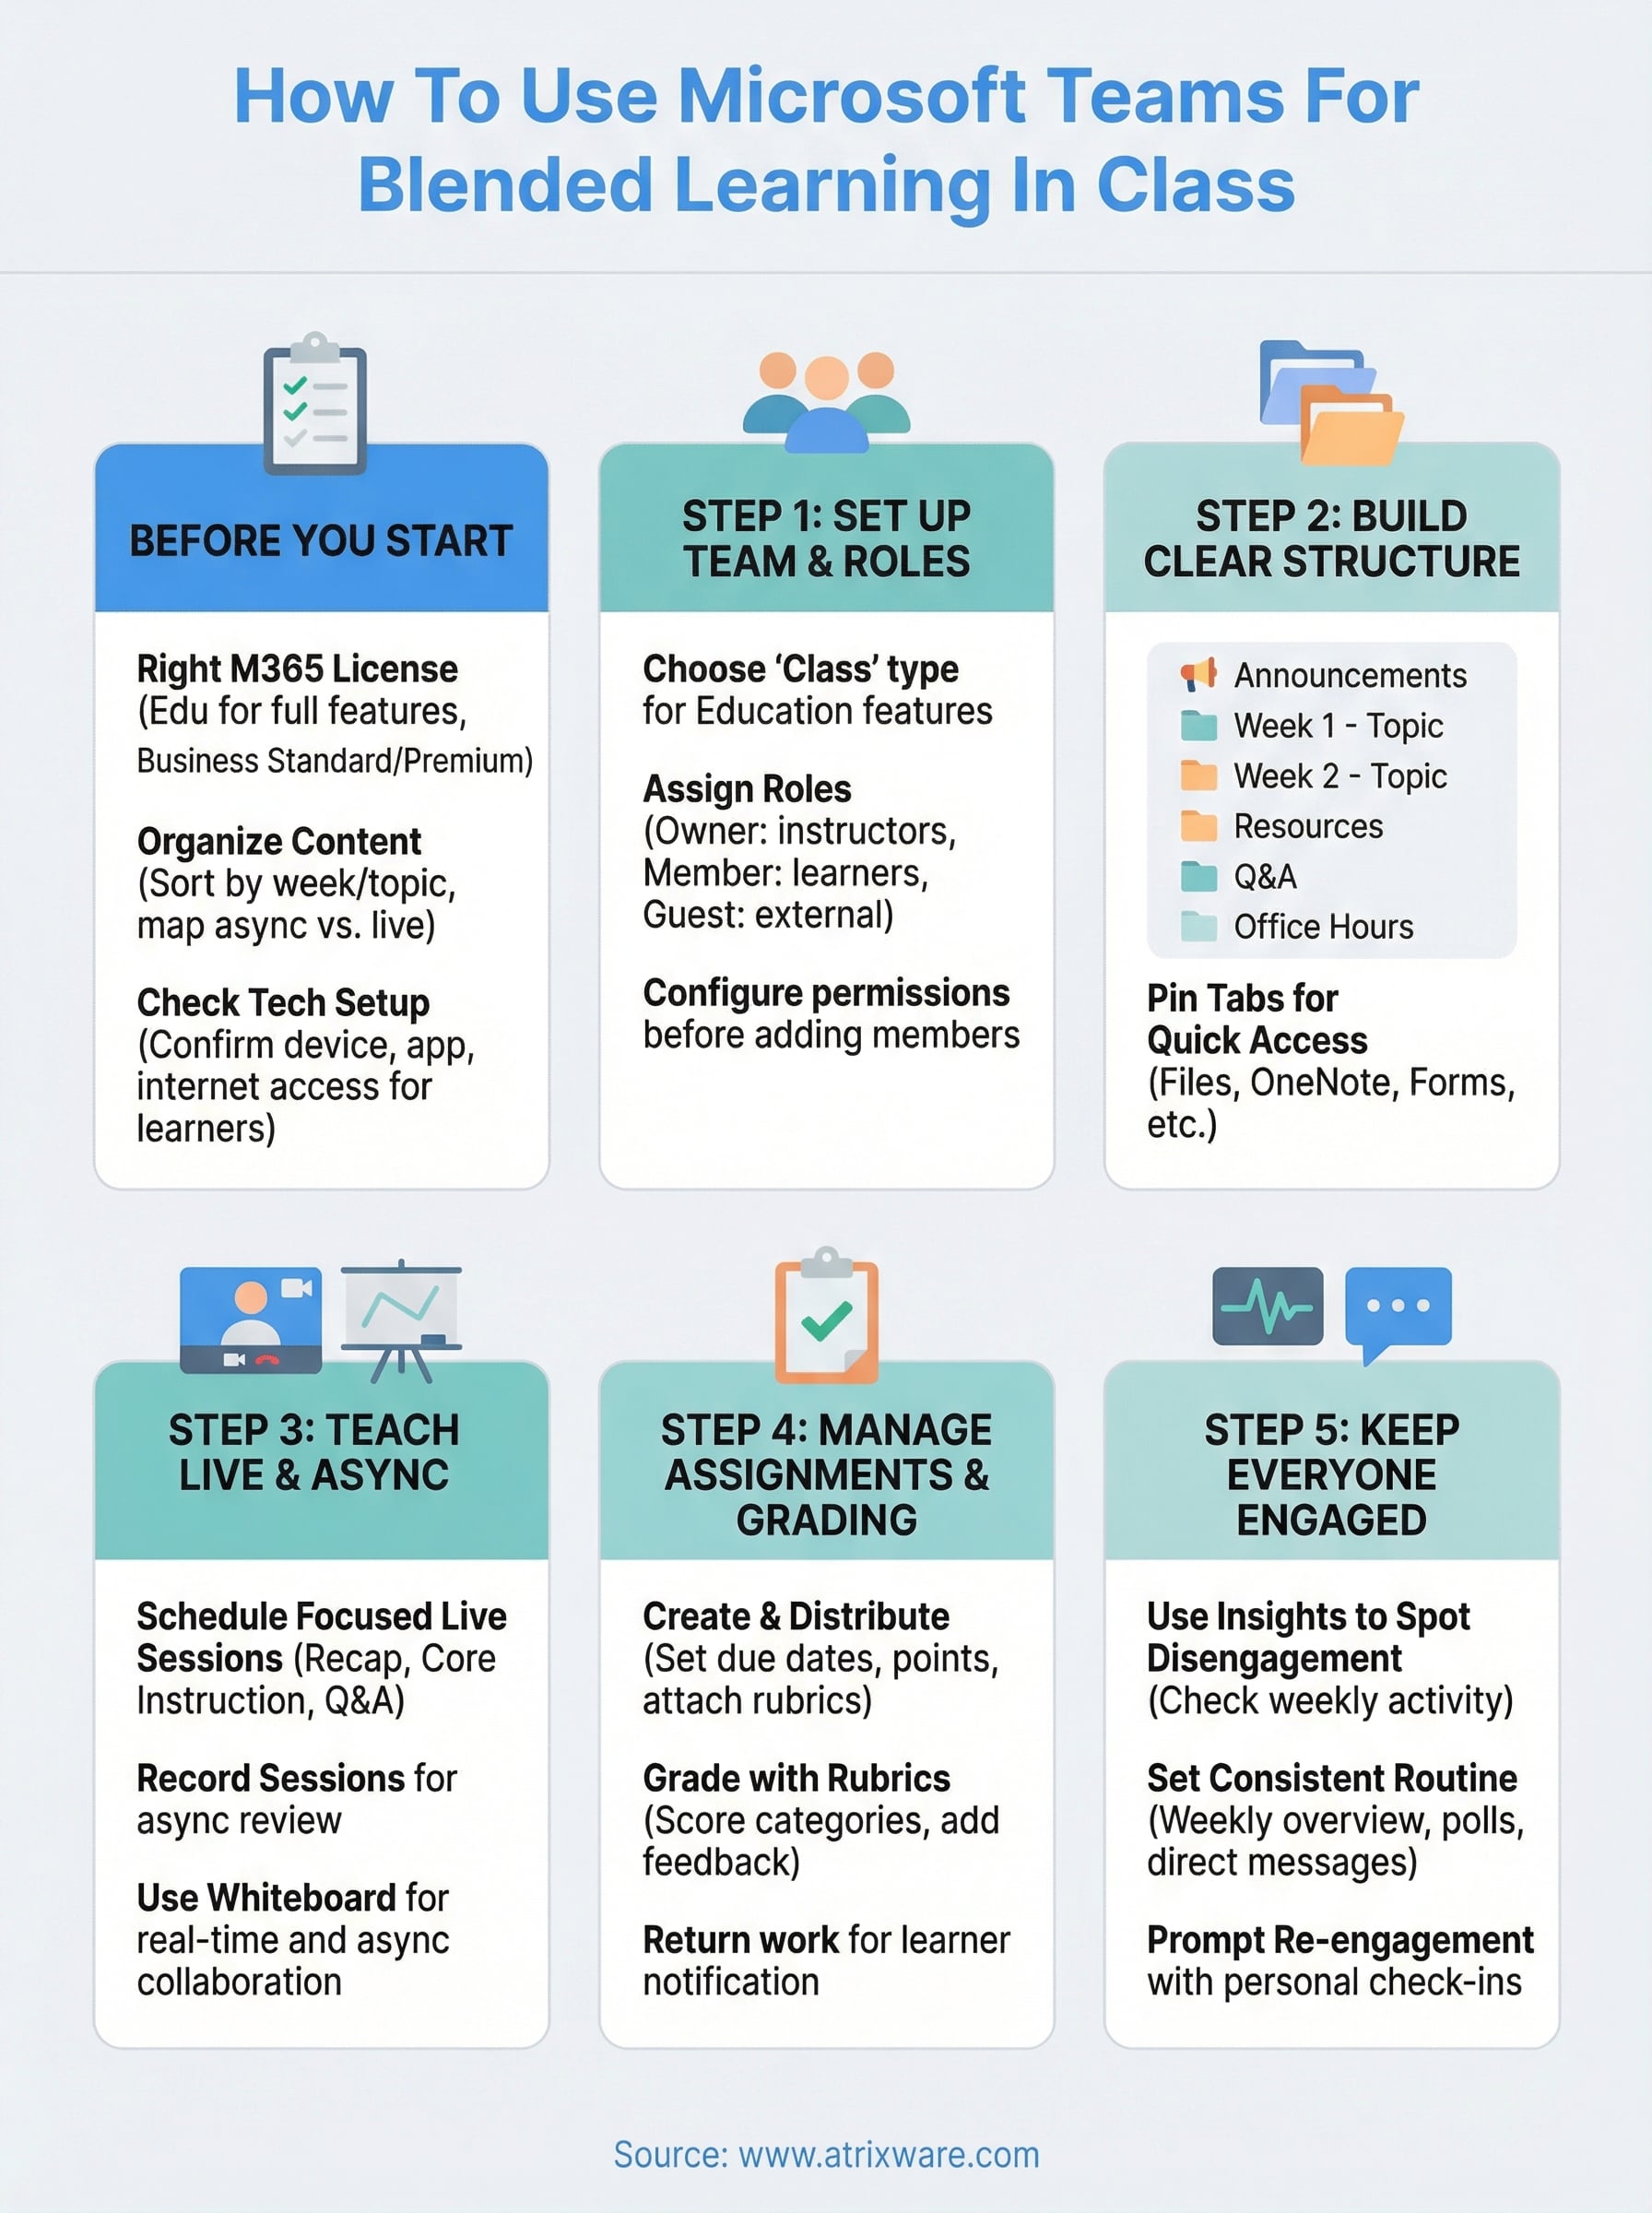
In this guide, we’ll walk through how to set up Microsoft Teams for blended learning step by step, from organizing your class structure to managing assignments and communication. And if you’re running training at an organizational level, platforms like Axis LMS from Atrixware can complement Teams by adding robust course delivery, progress tracking, and compliance management that Teams alone doesn’t provide. Whether you’re an instructor managing a single class or an L&D team scaling training across departments, you’ll find actionable steps here to build a blended learning setup that actually works.
What you need before you start
Before you touch a single Teams setting, you need to make sure the foundation is in place. Jumping straight into creating channels and uploading content without the right setup leads to problems that are frustrating to fix later, from permissions issues to content that learners simply can’t access. Taking 30 minutes to check these items upfront saves hours of troubleshooting down the road, and it means your first live session focuses on learning instead of tech support.
The right Microsoft 365 license and access
Your Microsoft Teams blended learning setup depends entirely on having the right license. Microsoft 365 Education licenses (A1, A3, or A5) include the full Teams for Education feature set, which covers Assignments, Grades, Reading Progress, and the Insights dashboard. If you’re running corporate or organizational training, a Microsoft 365 Business Standard or Business Premium license gives you access to the full Teams feature set, though you’ll rely on different tools for assignments and progress tracking. Confirm with your IT admin that your account has permission to create Teams and that all learner accounts are assigned and active before you build anything.
Without the right license tier, key features like Assignments and Insights won’t appear in your Teams interface at all, and you’ll design your entire setup around tools you don’t actually have access to.
Your content organized before you build
Trying to build your Teams structure while also hunting down files is a reliable way to create a messy, inconsistent setup. Before you start, gather all your course materials into one organized local folder, sorted by week or topic. This includes slide decks, PDFs, video links, quizzes, and any third-party content you plan to embed. Also identify which materials are async (self-paced or pre-recorded) and which require live interaction, so you know what belongs in a channel tab versus what needs a scheduled meeting.
Use this checklist before you open Teams and start building:
- Microsoft 365 license confirmed (Education or Business)
- All learner accounts created and verified by IT
- Team creation permissions granted to your account
- Course materials gathered and sorted by topic or week
- Async vs. live activities mapped out in advance
- Third-party tools (forms, polls, quizzes) identified and access confirmed
- Recording and storage settings reviewed for compliance or privacy requirements
A basic understanding of your learners’ tech setup
Building a polished Teams environment means nothing if your learners can’t reliably access it. Before launch, send a short survey or run a quick check asking learners to confirm they have a device that runs the Teams desktop app (more stable than the browser version), a working internet connection, and that they’ve logged into their Microsoft account at least once. For learners who are new to Teams entirely, schedule a brief 10-minute orientation before the first real session so that login issues and navigation questions don’t eat into actual instruction time.
Step 1. Set up your class team and roles
Getting your class team created correctly from the start sets the tone for your entire Microsoft Teams blended learning setup. A team built on the wrong template or with missing permissions will limit what you can do with channels, assignments, and learner communication later. Open Teams, click "Join or create a team", and choose the template that matches your context before you invite a single learner.
Choose the right team type
Teams offers several creation templates, and the one you pick determines which features are available to you. If you’re in an education environment, select "Class" as your team type. This unlocks the Assignments tab, the Grades view, and the student-specific Insights dashboard. If you’re in a corporate setting, select "Other" or use a custom template that your IT admin has configured. The Class type also automatically controls what students can post versus what only teachers can manage, which matters a lot for keeping your environment organized.
Microsoft does not let you convert a team from one type to another after creation, so picking the wrong type means rebuilding from scratch.
Assign owner, member, and guest roles
Once your team is created, configure roles before adding anyone. Here’s how each role works in practice:
- Owner: Can add or remove members, modify team settings, and delete the team. Assign this to yourself and any co-instructors.
- Member: Can participate in channels, post content, and submit assignments. Assign this to all learners.
- Guest: Has limited access and cannot view all content by default. Reserve this for external speakers or temporary observers.
You manage roles by clicking the three-dot menu next to your team name and selecting "Manage team." Review the member list here before your first session to catch any missing or incorrectly assigned accounts early.
Step 2. Build a clear structure with channels and tabs
Your channel structure is the backbone of your Microsoft Teams blended learning setup. When learners open Teams and see a cluttered list of vague channel names, they lose time searching instead of learning. A logical, consistent structure lets them find this week’s materials, submit work, and ask questions without ever needing to message you to ask where something lives.
Name and organize your channels by purpose
Every team starts with a General channel, but you should treat that as a class-wide announcements space, not a dumping ground for all content. Create dedicated channels for each week or module, and add a few persistent channels that stay relevant throughout the course. The naming convention you choose matters, so keep it predictable.

Here is a channel structure that works for most blended courses:
| Channel Name | Purpose |
|---|---|
| 📢 Announcements | Instructor-only posts, deadlines, updates |
| Week 1 – Topic Name | Materials, discussion, and tasks for that week |
| Week 2 – Topic Name | Same format, repeated per week or module |
| Resources | Shared documents, reference materials, links |
| Q&A | Learner questions, peer answers, instructor replies |
| Office Hours | Links to recurring meeting slots and notes |
Lock the Announcements channel so only owners can post. This prevents it from filling up with off-topic messages and keeps critical updates visible.
Pin tabs to put content one click away
Each channel supports pinned tabs at the top, which are shortcuts to files, websites, forms, or other Microsoft 365 tools. Inside each weekly channel, pin the relevant PDF or slide deck using the Files tab, add a OneNote tab for collaborative notes, and embed a Microsoft Form for quick comprehension checks. Learners see exactly what they need without digging through file threads. To add a tab, click the "+" icon at the top of any channel and select the app or file type you want to surface.
Step 3. Teach live and async with meetings and Whiteboard
In a microsoft teams blended learning setup, the way you run live sessions and structure async work determines whether learners stay engaged or start tuning out. Teams gives you two core tools for this: scheduled channel meetings for live instruction and Microsoft Whiteboard for both real-time and async collaboration. Using them intentionally, rather than just scheduling calls whenever content piles up, is what keeps your blended model functioning well.
Schedule and run live sessions with a clear structure
Every live session you schedule inside a channel should have a defined purpose and a tight agenda. Don’t use live time to walk through material learners could have reviewed on their own. Instead, reserve meetings for discussion, Q&A, walkthroughs of complex topics, and activities that benefit from real-time interaction. To schedule a meeting inside a channel, click the calendar icon in the channel conversation, set your time, and it will appear in both the channel and participants’ Outlook calendars automatically.
Record every live session directly in Teams by clicking the three-dot menu during the meeting and selecting "Start recording." The recording saves to the channel automatically and gives absent learners async access without any extra steps from you.
Use this session template to keep your structure consistent across every live meeting:
| Segment | Time | Purpose |
|---|---|---|
| Recap | 5 min | Review async material from the prior week |
| Core instruction | 15 min | Introduce or deepen one key concept |
| Activity or Q&A | 15 min | Apply, discuss, or clarify |
| Wrap-up | 5 min | Preview the next async task |
Use Whiteboard for live and async collaboration
Microsoft Whiteboard integrates directly into Teams meetings and can also be shared as a pinned tab inside any channel. During a live session, open Whiteboard to run brainstorms, concept maps, or group problem-solving activities in real time without switching to a separate tool.
Between sessions, pin a Whiteboard tab in the relevant channel and assign learners a concrete prompt to contribute to before the next meeting. This builds continuity between your live and async activities without pulling learners outside Teams.
Step 4. Manage assignments, grading, and feedback in Teams
The Assignments feature is one of the strongest reasons to use Teams for microsoft teams blended learning, and most instructors use only a fraction of what it can do. From one place, you can create, distribute, collect, and grade work without asking learners to submit through email or a separate platform. To access it, click the Assignments tab at the top of your class team. If you don’t see it, confirm that your team type is set to Class.
Create and distribute assignments
When you create a new assignment, fill in every field before you post it. Set a due date and a close date so learners know when late submissions stop being accepted. Under "Points," enter a value to connect the assignment to the Grades view automatically. Attach rubrics by clicking "Add rubric" so learners see exactly what you’re evaluating before they start.

Use this template as your assignment setup checklist:
| Field | What to enter |
|---|---|
| Title | Clear, specific task name |
| Instructions | What to do, how to submit, and the format expected |
| Due date | Exact date and time |
| Points | Numeric value tied to the grade |
| Rubric | Criteria and performance levels |
| Attachment | Supporting file, template, or example |
Grade work and give feedback that sticks
Once submissions come in, open the assignment and click "Review" next to any learner’s name. You’ll see their submitted work alongside the rubric you attached. Score each rubric category directly and add written feedback in the comments field before clicking "Return." Learners receive a notification and can view your comments without leaving Teams.
Written feedback attached to a rubric score lands better than a number alone because learners can see exactly what they need to improve before the next submission.
If you notice the same gap appearing across multiple submissions, post a follow-up message in the relevant channel addressing it for the whole group rather than repeating yourself in individual comments.
Step 5. Keep everyone engaged and on track
A blended course doesn’t run itself, and the biggest risk in any microsoft teams blended learning setup is learners going quiet between live sessions without anyone noticing until it’s too late. Teams gives you tools to monitor participation and prompt re-engagement before a small gap turns into someone falling completely behind. Use them consistently, not just when something feels off.
Use Insights to spot disengagement early
The Insights tab (available in Class teams) shows you per-learner data on activity, including messages sent, assignments submitted, meeting attendance, and files accessed. Open it at least once per week and look for learners who have gone two or more days without any recorded activity. That’s your signal to reach out directly through a private Teams chat rather than waiting for them to show up to the next live session on their own.
A quick one-sentence message like "Hey, I noticed you haven’t checked in this week, anything I can help with?" takes 30 seconds and often prevents a learner from dropping off entirely.
Set up reminders and consistent check-ins
You can’t rely on learners to remember every deadline or async task on their own. Schedule automated reminders by posting a weekly pinned message in the Announcements channel each Monday with that week’s tasks, due dates, and the live session link. Pair this with a short poll or reflection prompt posted in the Q&A channel mid-week using Microsoft Forms to keep async participation visible and low-stakes.
Use this weekly engagement routine as a repeatable template:
| Day | Action |
|---|---|
| Monday | Post weekly overview in Announcements |
| Wednesday | Share a mid-week poll or reflection prompt |
| Thursday | Send a direct message to any inactive learners |
| Friday | Post a summary of key discussion points from the week |
Running this routine consistently builds a predictable rhythm that learners rely on, which reduces drop-off and keeps your course moving forward.
Conclusion
Setting up microsoft teams blended learning correctly takes deliberate planning, but every step in this guide builds toward a class environment that actually functions without constant troubleshooting. You now have a clear path: start with the right license and organized content, build a logical channel structure, run focused live sessions paired with meaningful async work, manage assignments through the built-in tools, and use Insights to catch disengagement before it compounds.
The framework works because it removes friction for both you and your learners. Predictable structure and consistent routines replace the confusion that kills participation in most blended setups. Follow the templates and checklists in each step, adapt them to your specific course, and you’ll spend less time managing the platform and more time teaching.
If your organization needs more than Teams can offer for tracking, compliance, or course delivery at scale, explore what Axis LMS can add to your training program to find out where you stand.