Running a virtual classroom sounds straightforward until you’re actually doing it. Between picking the right platform, managing technical hiccups, and keeping learners engaged through a screen, there’s a lot more to how to run a virtual classroom than simply hitting "Start Meeting." Whether you’re training employees, onboarding new hires, or delivering compliance sessions, the setup and facilitation matter just as much as the content itself.
At Atrixware, we build Axis LMS, a learning management system that helps businesses deliver and manage both online courses and live virtual classroom training. We’ve seen firsthand what separates a productive virtual session from one where half the attendees are checked out by minute ten. The difference almost always comes down to preparation and the right tools.
This guide walks you through the full process: choosing your platform, configuring your technical setup, structuring your sessions for maximum engagement, and applying practical facilitation techniques that actually work. If you’re responsible for training at your organization, this is the playbook to get your virtual classroom running smoothly from day one.
What you need before you run a virtual classroom
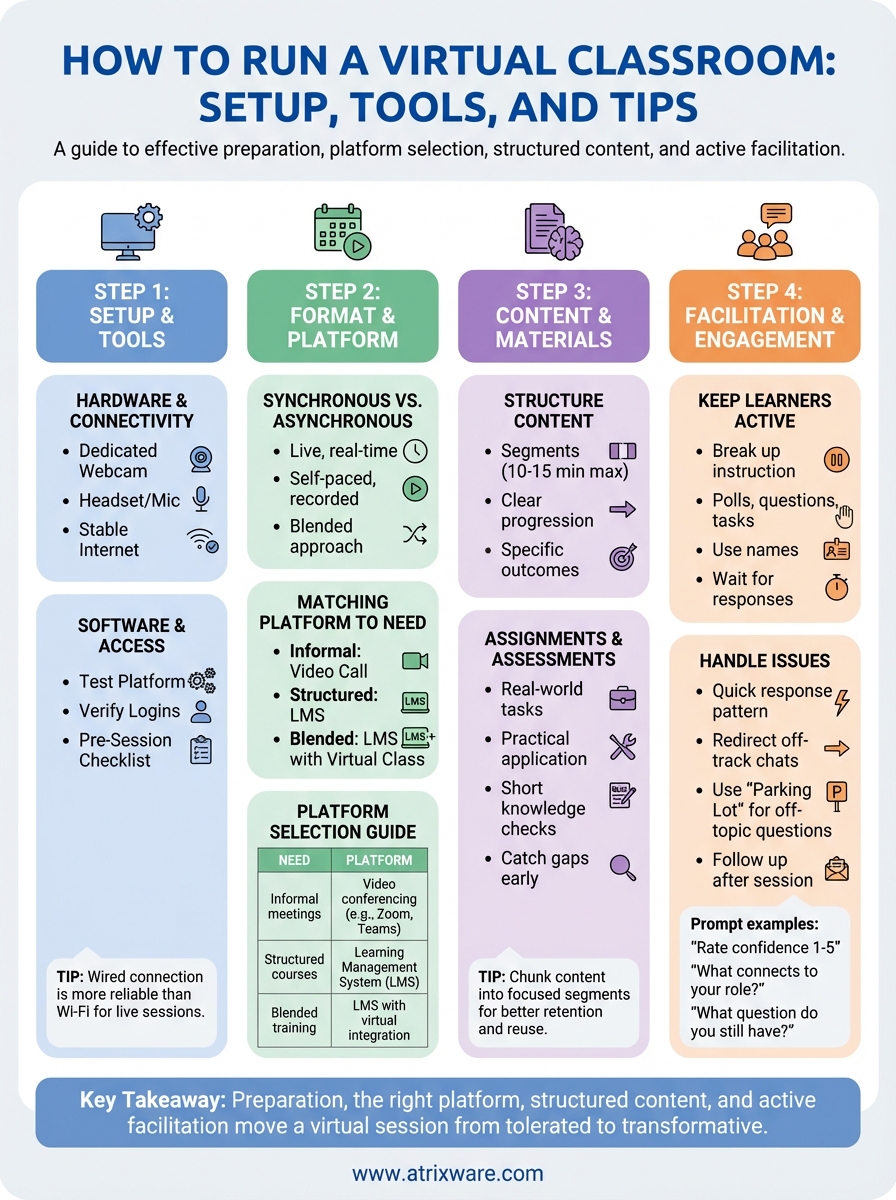
Before you think about facilitation techniques or engagement tactics, you need to make sure the basics are in place. Skipping the preparation phase is the most common reason virtual classrooms fall apart. Knowing how to run a virtual classroom well starts with a clear inventory of what you and your learners need before the first session begins.
Hardware and connectivity
Your hardware setup directly affects the quality of your audio and video, which in turn affects how much learners trust the experience. At a minimum, you need a dedicated webcam, a headset or external microphone, and a stable internet connection. Built-in laptop cameras and speakers often produce low-quality output that distracts learners and makes it harder to stay focused.

A wired ethernet connection is more reliable than Wi-Fi for hosting live sessions, especially if you are screen sharing or streaming video content.
Check that your machine meets the minimum system requirements for your chosen platform. Microsoft publishes hardware recommendations for Teams that are worth reviewing before your first session, regardless of which tool you ultimately use.
Software and platform access
Your learners need to be able to join the session without friction. That means testing your platform in advance, confirming that participants have login credentials, and verifying that any required software is installed or accessible through a browser. Nothing kills session momentum faster than spending the first ten minutes troubleshooting access issues.
Send participants a short pre-session checklist at least 24 hours before the class starts. Here is a simple template you can adapt:
Pre-Session Checklist for Learners:
- Confirm login credentials and test sign-in on the platform
- Check audio and video in the platform’s built-in test environment
- Download any required course materials or files in advance
- Review the session agenda so you know what to expect
- Test your internet connection (aim for at least 5 Mbps upload and download)
Your content and session materials
Before the session, have all slides, documents, and activity files ready and organized in a single folder. Searching for files mid-session is distracting for you and immediately visible to everyone in the room. Map out your session flow in a run-of-show document that lists each activity, the time allocated, and who owns it.
If you plan to use polls, breakout groups, or assessments, configure those inside your platform ahead of time. Doing this prep work early also gives you the opportunity to spot gaps or ambiguities in the material before learners encounter them during a live session, which is far easier to fix than trying to course-correct on the fly.
Step 1. Choose your class format and platform
Your first real decision when figuring out how to run a virtual classroom is whether your sessions will be live and synchronous or self-paced and asynchronous. Getting this wrong early creates problems that are hard to fix later, so it’s worth taking a few minutes to think it through before you commit to any platform.
Synchronous vs. asynchronous: pick one first
Synchronous training happens in real time, with an instructor and learners present at the same time via video conferencing or a virtual classroom tool. Asynchronous training lets learners move at their own pace through pre-recorded content, readings, and assessments without requiring a scheduled session. Many organizations use a blended approach: recorded modules for foundational content, with live sessions reserved for Q&A, practice, or skills application.
If your training involves compliance topics, complex procedures, or content that benefits from direct discussion, synchronous sessions will produce better outcomes than recorded content alone.
Matching your platform to your format
Once you know your format, you can select a platform that actually fits it. A simple video call tool works for small, informal sessions, but it won’t give you enrollment tracking, automated reminders, or course completion records. For structured training programs, you need a platform that ties your live sessions to a broader learning workflow.

Use this comparison to narrow your options:
| Training Need | Recommended Platform Type |
|---|---|
| Informal team meetings or one-off sessions | Video conferencing (e.g., Zoom, Teams) |
| Structured courses with self-paced modules | Learning Management System (LMS) |
| Blended live + asynchronous training | LMS with virtual classroom integration |
| Compliance or certification tracking | LMS with reporting and CEU tools |
Choosing a platform that handles both your live sessions and your course management in one place reduces administrative overhead and gives you a single source of truth for learner progress.
Step 2. Set up your classroom space and routines
Once your platform is chosen, the next thing to configure is your actual environment and the repeatable patterns that will define each session. A consistent setup removes friction for both you and your learners, and it signals professionalism from the moment people join. This step is where knowing how to run a virtual classroom moves from theory into practice.
Your physical and audio setup
Your background, lighting, and microphone quality shape the first impression learners form before you say a single word. Position yourself facing a natural light source or a soft ring light so your face is clearly visible. Avoid sitting with a window behind you because it silhouettes your face and makes you harder to read during live instruction.
Audio quality matters more than video quality: a clear voice with a slightly grainy image is far less distracting than crystal-clear video with choppy or echoing sound.
Reduce background noise by closing doors, silencing phone notifications, and using a headset or cardioid microphone instead of your laptop’s built-in option. Test your setup by recording a 60-second video before your first session and watching it back with fresh eyes.
Building repeatable session routines
Learners perform better when they know exactly what to expect at the start and end of every session. A predictable structure reduces cognitive load and lets people focus on the content rather than figuring out the format. Build a short routine and stick to it across every class.
Use this template as your standard session flow:
Virtual Classroom Session Routine Template:
- Open (5 min): Welcome, confirm audio and video, share the session agenda
- Warm-up (3 min): One quick question or poll to activate prior knowledge
- Instruction (variable): Deliver content in segments no longer than 15 minutes each
- Activity (variable): Apply learning through discussion, breakout tasks, or exercises
- Close (5 min): Summarize key takeaways, assign any follow-up, confirm next steps
Step 3. Build content, assignments, and assessments
Good content does not just inform learners; it moves them through a clear progression from what they already know to what they need to do differently. Before you build anything, define the specific outcome you want learners to achieve by the end of the session or course. Every piece of content, every assignment, and every assessment should connect directly to that outcome. This is the core discipline that separates effective virtual training from a slide deck with a quiz attached.
Structure your content in learning segments
Long, unbroken stretches of instruction are one of the fastest ways to lose attention in a virtual setting. Break your material into segments of 10 to 15 minutes maximum, each focused on a single idea or skill. Between segments, build in a short activity, a check-in question, or a brief summary to help learners process what they just covered before moving to the next topic.
Chunking content into short, focused segments also makes it easier to reuse individual pieces in future sessions or self-paced modules without rebuilding from scratch.
Design assignments that connect to real work
Assignments should ask learners to apply the training directly to a task they actually perform, not just recall information from a slide. A practical assignment template for most corporate training topics looks like this:
Assignment Template:
- Context: Describe the real-world situation this task relates to
- Task: Specify exactly what the learner must produce or complete
- Criteria: List what a successful submission includes
- Submission format: Define how learners submit (file upload, typed response, recorded video)
Add assessments that measure actual learning
Knowing how to run a virtual classroom also means knowing whether your learners are actually retaining the material. Use short knowledge checks of three to five questions at the end of each content segment rather than saving all assessment for the end. This catches gaps in understanding early, while there is still time to address them during the session or in a follow-up module.
Step 4. Facilitate live sessions and drive engagement
Preparation gets you to the start line, but how you facilitate the live session determines whether learners walk away with something useful. Knowing how to run a virtual classroom means staying present, reading the room, and adjusting on the fly. Your role during a live session is less about delivering a script and more about actively managing attention and participation across everyone in the virtual space.
Keep learners active throughout the session
Passive listening is the enemy of retention. Break up every 10 to 15 minutes of instruction with a direct question, a quick poll, or a short task that requires learners to respond. When you ask a question, wait a full five seconds before answering it yourself. Silence feels longer on a video call than it does in person, but most learners will fill it if you give them the space.
Calling learners by name when prompting responses increases participation rates significantly, especially in groups larger than five people.
Use this quick facilitation prompt bank to spark responses during live sessions:
- "What’s one thing from the last segment that connects to your current role?"
- "Rate your confidence on this topic from 1 to 5 in the chat."
- "If you were explaining this to a colleague, how would you describe it?"
- "What question do you still have after that section?"
Handle problems without losing momentum
Technical issues and off-track discussions are inevitable in any live virtual session. The key is having a quick response pattern ready so small problems don’t derail the whole class. If a learner loses audio or video, move on and follow up with them individually after the session rather than pausing the entire group. If a discussion goes off-topic, redirect with a specific question tied directly back to the session objective.
Keep a visible "parking lot" in your shared notes or chat where you log questions that fall outside the session scope. Address them in a structured follow-up email after the session so no question goes ignored and learners see that their input matters.
Wrap-up and next step
Running a virtual classroom well comes down to four things: preparation, the right platform, structured content, and active facilitation. When you combine those four elements, you move from a session that people tolerate to one that actually changes how they work. Each step in this guide builds on the last, so if something feels off in your live sessions, trace it back to an earlier phase and address it there before your next session.
Now that you know how to run a virtual classroom from setup to live facilitation, the logical next step is making sure your platform can support everything covered here. Axis LMS gives you the tools to host virtual sessions, manage enrollments, and track completion, all in one place. If you’re not sure where you stand in the buying process, take our LMS readiness quiz to find out exactly what you need next.